 Pin It
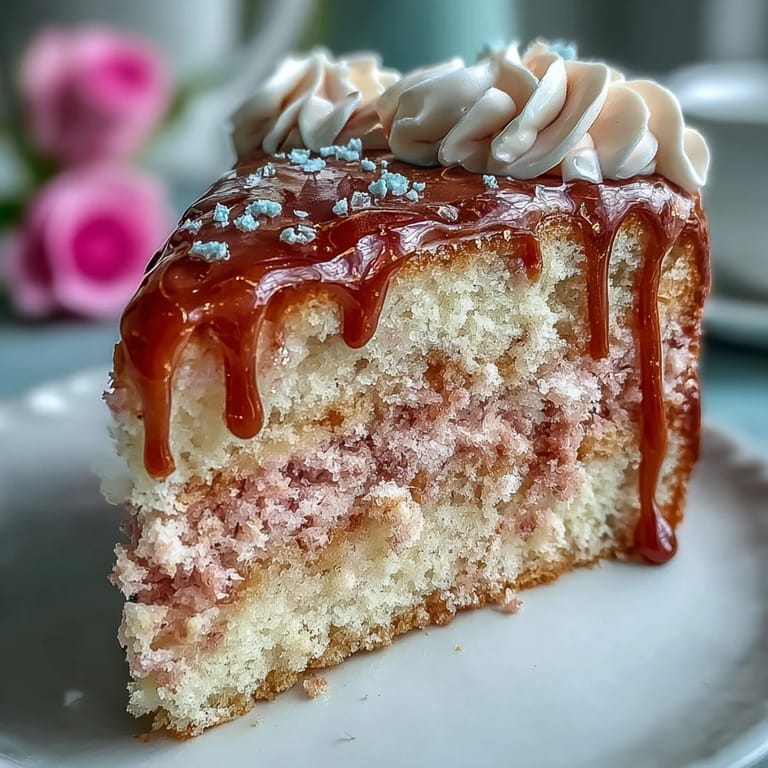
 Cake recipes sometimes demand a little drama, and I learned this firsthand the weekend I attempted my first ever Bridal Shower Rosé Velvet Cake. Somewhere between the shimmer of gold luster dust and the blush-pink crumb, my kitchen filled with the scent of butter and vanilla and just a whisper of wine. The radio was humming in the background, and I found myself beaming at the prospect of creating something truly celebratory, even if it risked a faint powdered sugar cloud landing on the dog. There's a unique joy in chasing the perfect color of blush, and the process felt as much art project as baking session. That first golden drip reminded me: it's always worth the little bit of fuss for moments that feel this special.
When I baked this cake for my cousin's bridal shower, I caught my aunt stealing a swirl of leftover frosting while declaring it tasted like "happiness and fancy parties." Each slice disappeared quickly, and the oohs and aahs over that shimmering drip almost overshadowed her unwrapping the wedding gifts. That laughter over frosting-stained fingers is what I remember most. No one even pretended to wait until dessert hour. Extra napkins were demanded, not for neatness, but so no crumb—or sparkle—was left behind.
Ingredients
- All-purpose flour: Always sift for extra-light layers, and measure carefully to avoid a dense cake.
- Granulated sugar: Creaming it patiently with butter ensures that signature velvety crumb.
- Baking soda and powder: Use both for the best lift; I found freshly opened baking powder works wonders.
- Unsweetened cocoa powder: Just enough to give depth, without overpowering the rosé—try Dutch processed for a richer hue.
- Unsalted butter: Room temperature is key; cold butter sabotages even the best intentions (and mixers).
- Buttermilk: If you're out, add a tablespoon of lemon juice to regular milk and let it sit for five minutes.
- Rosé wine: Go with something dry and fruity for a grown-up, not-too-sweet accent; avoid anything too oaky.
- Eggs: Room temp eggs blend in so much easier—set them out first thing.
- Vanilla extract: Splash a little extra if you're feeling generous.
- White vinegar: Don't skip! It reacts with the leaveners for the fluffiest texture.
- Pink food coloring gel: Add gradually, stirring lightly for a beautiful blush; less is more here.
- Cream cheese: Let it fully soften for lush, lump-free frosting (patience pays off).
- Powdered sugar: Always sift to dodge surprise lumps in your frosting.
- Heavy cream: For the gold drip, don't overheat or the chocolate may seize.
- White chocolate chips: Use the best you can find—quality chocolate means a smoother, glossier drip.
- Gold luster dust and vodka/clear extract: Mix just before painting for the most vibrant shimmer.
- Butter (for frosting): Again, soft is best—firm cubes just don't whip as airy.
- Pinch of salt: It balances out the sweetness and makes the flavors sing.
Tired of Takeout? 🥡
Get 10 meals you can make faster than delivery arrives. Seriously.
One email. No spam. Unsubscribe anytime.
Instructions
- Prep Your Pans and Oven:
- Preheat your oven to 350°F (175°C) and line your cake pans—grease, then parchment, so nothing sticks.
- Dry Ingredients Sift:
- Whisk flour, cocoa, leaveners, and salt in one bowl; the cocoa's subtle scent lets you know it's all coming together.
- Cream Butter and Sugar:
- Beat them until you see it lighten and become fluffy—set a timer so you don't rush this.
- Add Eggs and Vanilla:
- Drop in eggs one at a time, mixing well and scraping the bowl—then add the vanilla for an instant lift of aroma.
- Mix Wet Ingredients:
- Combine buttermilk, rosé, and vinegar in a measuring cup—a swirl of pink and cream before it all goes in.
- Combine and Tint:
- Gently alternate adding dry and wet mixtures to the butter bowl, mixing until just smooth; add food coloring slowly, checking for that perfect blush tone.
- Bake:
- Divide the batter into pans and bake until a skewer pulls out just clean; your kitchen will smell like a patisserie.
- Cool Completely:
- Let cakes rest in pans briefly, then flip onto racks, enjoying the gentle steam and imagining the layers finished.
- Frosting Time:
- Cream together butter and cream cheese until glossy, then steadily add in powdered sugar, rosé, vanilla, and salt, whipping to billowy peaks.
- Assemble and Chill:
- Level layers, stack with generous frosting, apply a crumb coat, chill, then finish with a final smooth layer—don't rush, enjoy the rhythm of your spatula.
- Make the Gold Drip:
- Melt white chocolate and cream in bursts, let it cool just slightly, then drip over the edges—this is the part everyone wants to photograph.
- Paint It Gold:
- Mix luster dust with vodka, and gently brush it onto the drip for an elegant gleam—channel your inner artist.
- Chill and Serve:
- Chill the finished cake so the frosting and drip set beautifully, then slice and serve with a flourish.
 Pin It
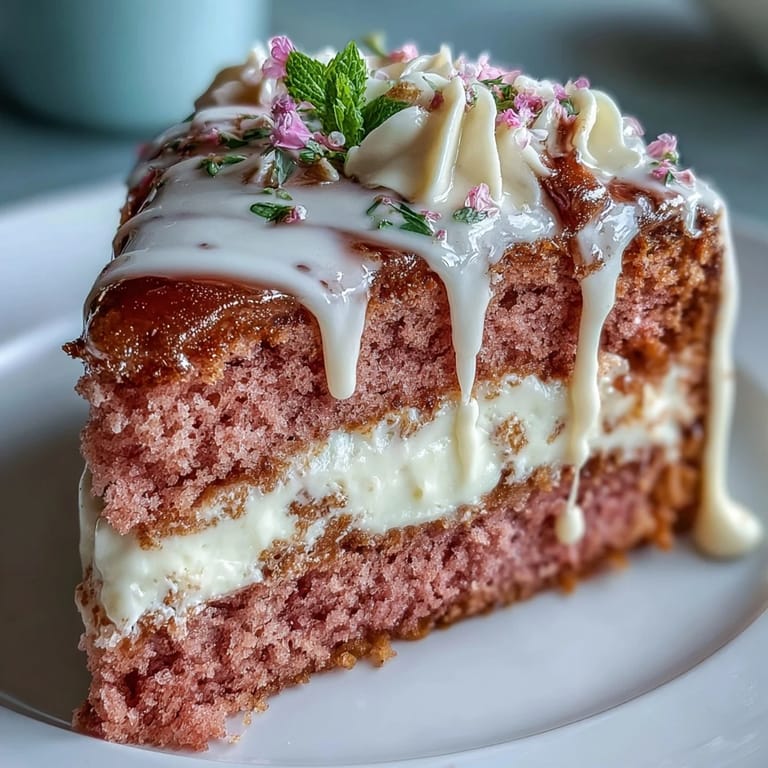
 I'll never forget the sunlit kitchen the morning we sliced into this cake for my best friend's engagement—someone gasped, someone else burst into applause, and for a tiny moment, we were all five years old and everything felt possible. Sometimes, a cake isn't just dessert; it's the centerpiece of a celebration, glittering as brightly as the memories it helps create.
Decorating Secrets for a Stunning Finish
Do yourself a favor: use an offset spatula for the smoothest sides, and don't be afraid of a slightly imperfect gold drip—those little rivulets look just as delightful as any bakery creation. I also found that scattering a few edible flowers or gold leaf flakes on top makes the cake look magical, with minimal effort. If you're serving outside, keep the cake cool until the last minute to prevent the drip from melting off. No one complains about some extra smudges; in fact, it usually means another taste test for the decorator. Have a soft brush for dusting stray sprinkles or excess luster dust before the big reveal—it instantly polishes the look.
Make-Ahead and Storage Tips
With how much care goes into each layer, make the sponges a day ahead and wrap them tightly once cool; they'll stay moist and are even easier to frost once chilled. The finished, frosted cake with its drip keeps happily in the fridge for up to three days—just bring it to room temperature before slicing so everyone can enjoy the full creamy texture. If you need the cake to travel, pop it in a deep cake box and anchor it with a little non-slip mat underneath. Any leftover frosting can be piped into rosettes or stuffed into cookies, which is dangerously good. And cake scraps make excellent trifle bases—trust your inner resourceful baker.
What to Pair With Rosé Velvet Cake
I've served this cake with everything from fresh berries to coupes of chilly rosé—it pairs beautifully with crisp fruit or something slightly tart to balance the sweetness. Try a bit of lemon sorbet on the side, or a scattering of raspberries for extra color and zing. Wedding tea blends, sparkling water with strawberries, or a glass of bubbly rosé all add to the occasion with very little fuss. Once, we paired it with lavender shortbread cookies and the combination stole the show. If you're feeling extra, a sprinkle of pink sea salt on the frosting right before serving is a subtle, grown-up twist.
- Chill your plates before serving to keep the frosting intact.
- Clean your knife between slices for sharp, layer-perfect pieces.
- Store leftover cake airtight and enjoy it within three days.
 Pin It
 If there was ever a cake meant to inspire delight, it's this one. However you decorate it, each slice brings a little sparkle into the room—so don't be surprised when everyone asks for seconds.
Questions & Answers
- → How can I intensify the rosé flavor without thinning the batter?
Lightly brush cooled cake layers with a small amount of reserved rosé wine or a concentrated rosé syrup. Add rosé to the frosting in tablespoons, tasting as you go, to boost aroma without altering texture.
- → What ensures a smooth, controlled gold drip?
Use white chocolate melted with heavy cream to a pourable consistency, cool to room temperature, then apply with a spoon or squeeze bottle. Test drips on a chilled plate first, and thin with a touch more cream if too stiff.
- → How do I get an even blush-pink color in the cake layers?
Add gel food coloring a little at a time to the batter until you reach the desired blush. Gel concentrates color without adding liquid, so it won't affect crumb or bake time.
- → Can I make the gold effect without alcohol?
Yes. Mix edible gold luster powder with a few drops of clear food-grade extract or lemon juice instead of vodka to create a paintable glaze for the drip.
- → How should I store the finished cake?
Keep the cake refrigerated on a cake stand or covered loosely with a dome to protect the gold finish. Bring to room temperature for 30–60 minutes before serving for best texture and flavor.
- → Any tips for stabilizing the cream cheese frosting?
Ensure butter and cream cheese are fully softened and beat until smooth before adding sifted powdered sugar. Chill the assembled cake briefly for a firm crumb coat, which helps a clean final finish.